Image Resizer AI
“The Shopify image compressor allowed us to quickly reduce our collection banner file sizes while preserving sharp product clarity. Super smooth client-side experience!”
Upload Images
Drag & drop your files here, or click to browse
First upload a photo and shrink its file size in seconds - right in your browser, there is no need to instaal any software and no account to create. ImageResizerAI's Instagram compressor is built for creators, small business owners, social media managers, and anyone tired of watching Instagram flatten their photos into a blurry mess after upload.
The tool works with JPEG, PNG, WebP, and HEIC files, and it processes everything locally on your device. Nothing gets uploaded to a server, so your images never leave your computer or phone. If you post regularly and want your feed to load fast without sacrificing detail, this is the fastest way to get there.
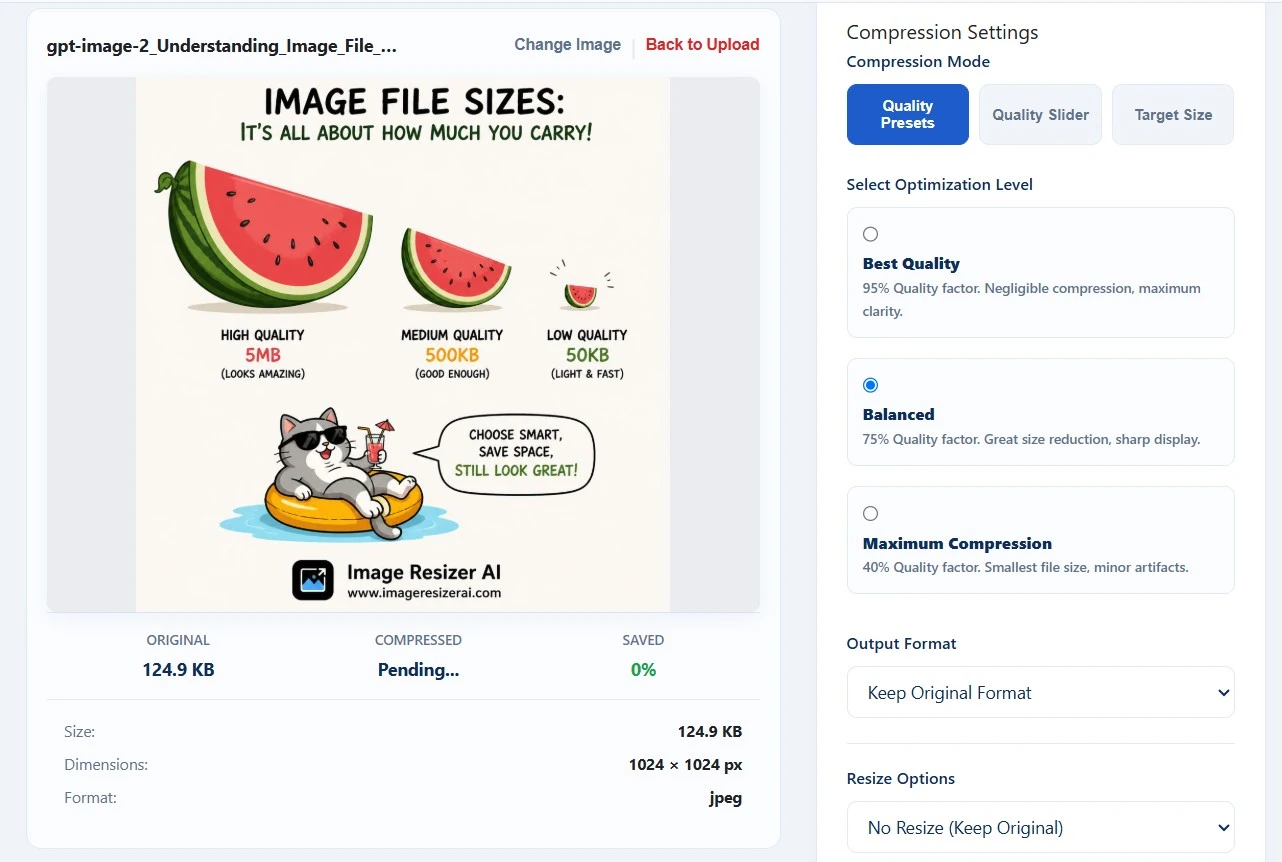
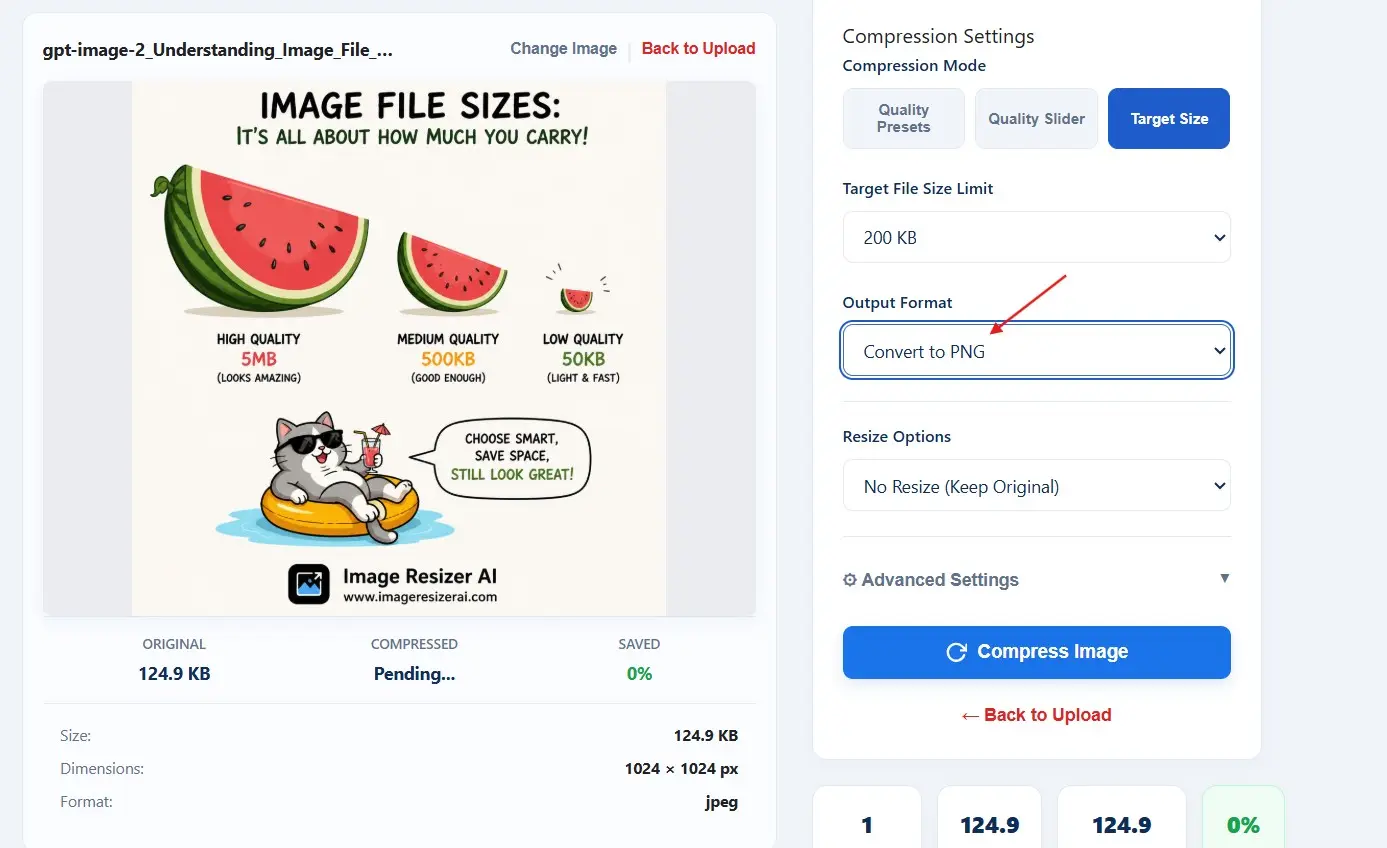
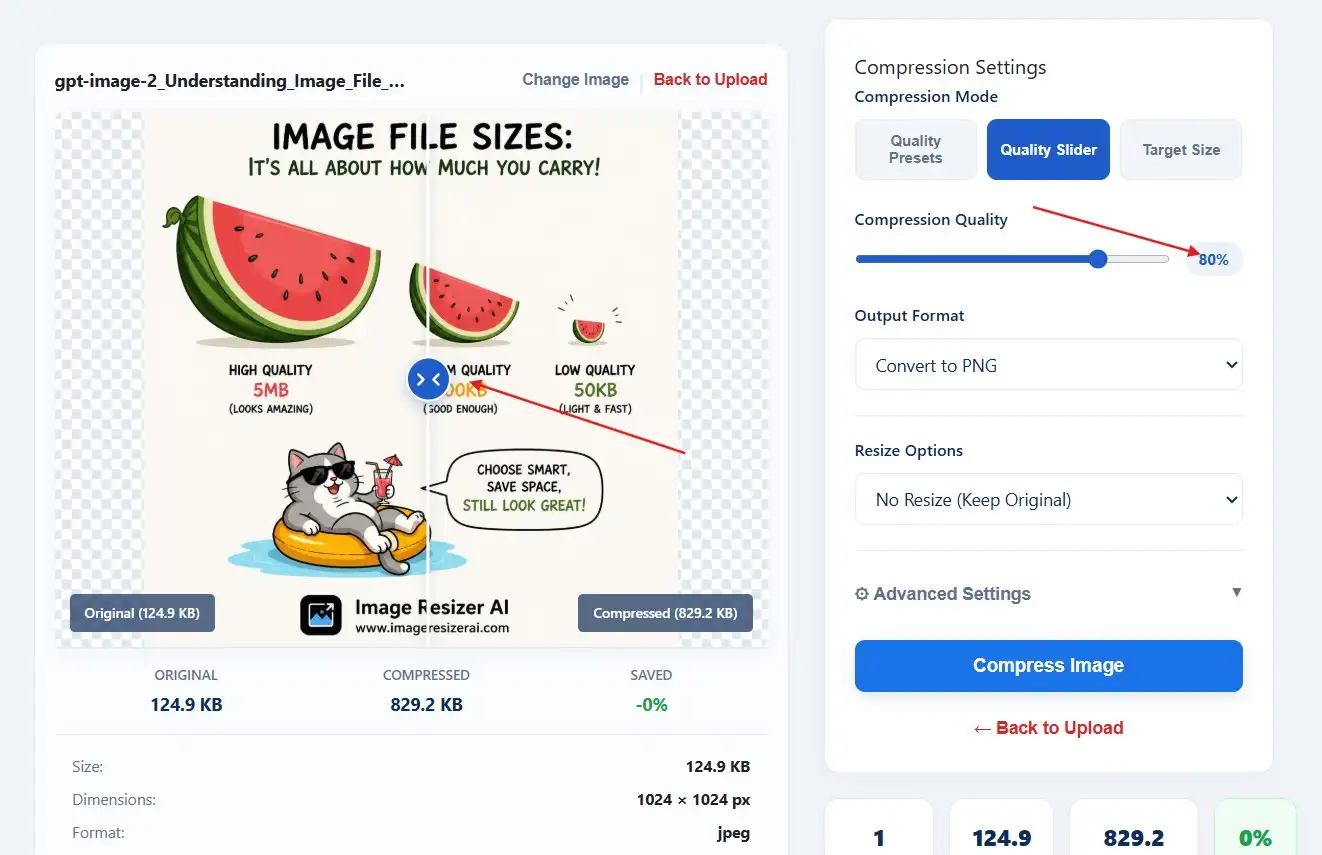
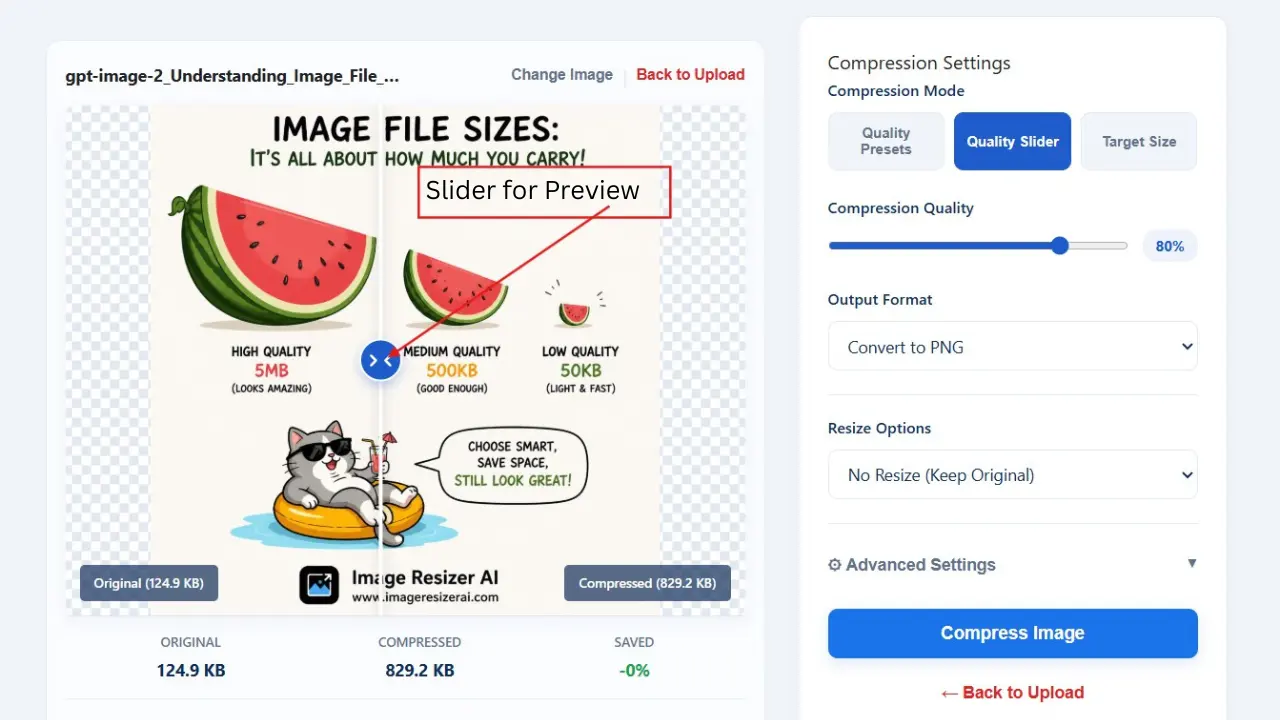
These two terms get used interchangeably, but they solve different problems. Understanding the difference helps you pick the right tool for the right job.
| Feature | Image Compressor | Image Resizer |
|---|---|---|
| Purpose | Reduces file size while keeping the same dimensions | Changes the pixel dimensions (width/height) of an image |
| File Size | Significantly reduced (often 50-90% smaller) | May change slightly, but not the primary goal |
| Dimensions | Unchanged | Changed to match a target size or aspect ratio |
| Quality | Slight, controlled quality trade-off | No quality loss if done correctly (unless upscaling) |
| Best Use Cases | Speeding up uploads, saving storage, meeting file-size limits | Fitting Instagram's aspect ratios, cropping for Stories/Reels/feed posts |
Using the correct dimensions for each post type reduces how much Instagram needs to resample your image after upload, which helps preserve quality.
| Post Type | Recommended Resolution | Aspect Ratio | Recommendation |
|---|---|---|---|
| Square | 1080 x 1080 px | 1:1 | Safe, classic feed format |
| Portrait | 1080 x 1350 px | 4:5 | Takes up more vertical feed space |
| Landscape | 1080 x 566 px | 1.91:1 | Best for wide scenes, least vertical space |
| Stories | 1080 x 1920 px | 9:16 | Full-screen vertical format |
| Reels Cover | 1080 x 1920 px | 9:16 | Match Reels video dimensions |
| Profile Picture | 320 x 320 px (min) | 1:1 | Displayed as a circle - keep subject centered |
| Carousel | 1080 x 1080 px or 1080 x 1350 px | 1:1 or 4:5 | Keep all slides the same ratio for consistency |
| Format | Best For | Notes |
|---|---|---|
| JPEG / JPG | Photos | Most compatible, efficient lossy compression |
| PNG | Graphics, text, transparency | Lossless, larger file sizes for photos |
| WebP | Photos and graphics | Strong compression efficiency, widely supported |
| HEIC | iPhone photos | Efficient but less universally compatible; convert before sharing outside iOS |
| GIF | Simple animations | Limited color palette, not ideal for photographic content |
Compression changes how efficiently an image's data is stored; resizing changes the image's actual pixel dimensions.
For example, a 4000 x 3000 pixel photo compressed at 80% quality might shrink from 8MB to 1.5MB while remaining 4000 x 3000 pixels - same size on screen, smaller file. Resize that same photo to 1080 x 810 pixels instead, and you've reduced the actual amount of visual information it contains, which also reduces file size, but for a completely different reason.
In practice, the two often go together: resize an image to the dimensions Instagram actually needs, then compress the result to bring the file size down further without losing any dimensional detail you weren't going to use anyway.
ImageResizerAI processes every image directly in your browser, meaning your photos are never uploaded to a server. This matters for privacy - especially for photographers, businesses, or anyone working with unreleased or sensitive content.
Getting your Instagram photos looking sharp comes down to a few controllable decisions: the right dimensions, a sensible quality setting, and a format that suits the image. Explore all our free Instagram Tools to resize feed posts with our Instagram Post Size Converter or format stories using the Instagram Story Resizer.
See what creators and marketers think of our 100% browser-based tools.
“The Shopify image compressor allowed us to quickly reduce our collection banner file sizes while preserving sharp product clarity. Super smooth client-side experience!”
“The Instagram Border Maker saved me so much time! Super clean output and 100% private in-browser processing.”
“Instant EXIF and GPS metadata stripping without losing image quality. Essential tool before posting photography online.”
“Loved the 1-click PNG swatch export and CSS variables generator! Made matching post color schemes effortless.”
“The 2x2 grid collage builder with live preview and custom spacing is insanely fast and mobile-friendly.”
“Auto-detecting image dimensions and showing instant crop/fit compatibility badges for all Instagram formats is genius!”
Got questions? Find conversational answers below.
Upload your photo to a compressor tool, choose your target format (JPEG or WebP work well), and adjust the quality slider until you find a balance between file size and visual clarity - typically somewhere between 75-85% quality. Preview the result before downloading, then upload the compressed file to Instagram as usual. If your image also needs to change shape or size, resize it first, then compress.
The best compressor depends on your priorities, but for most users, a browser-based tool that doesn't require uploads offers the best combination of speed and privacy. Look for one that supports the formats you actually shoot in (JPEG, PNG, WebP, HEIC), gives you a visible quality slider rather than a fixed setting, and shows a before-and-after file size comparison so you can make an informed choice.
Some quality loss is inherent to lossy compression, but at moderate settings (75-85%) the loss is generally imperceptible at normal viewing sizes. For truly lossless compression, PNG is an option, though it produces much larger files for photographic content. The realistic goal isn't zero quality loss - it's quality loss small enough that no one notices.
Yes. Many browser-based compressors, including ImageResizerAI, are free to use without account creation or file limits for typical use. Free tools that process images locally in your browser also avoid the privacy trade-off of uploading photos to a third-party server.
JPEG, PNG, WebP, and HEIC are the most commonly compressed formats for Instagram uploads. JPEG and WebP are best suited to photographs, PNG works well for graphics with text or transparency, and HEIC is common for photos taken directly on iPhones but is often converted before sharing elsewhere.
It reduces a photo's file size by re-encoding the image data more efficiently, discarding information that has minimal visible impact while preserving detail in areas the eye notices most, like edges and faces. The pixel dimensions of the image stay the same - only the file size and, to a controlled degree, fine detail are affected.
It's not required, since Instagram compresses every uploaded image automatically regardless of what you do beforehand. However, compressing your image yourself first gives you control over the outcome instead of leaving all compression decisions to Instagram's own algorithm, which often produces less predictable results, especially on large, uncompressed files.
Resizing changes an image's pixel dimensions - its width and height. Compression changes how efficiently the image data is stored, reducing file size without necessarily changing dimensions. A photo can be compressed without being resized, and resized without significant compression, though most workflows benefit from doing both in sequence.
This tool is built specifically for image compression, not video. Video compression uses different algorithms centered around frame-by-frame and motion data, and generally requires a separate, dedicated tool designed for that format.
It depends on the post type. Square posts work best at 1080 x 1080 pixels, portrait posts at 1080 x 1350 pixels, landscape posts around 1080 x 566 pixels, and Stories or Reels covers at 1080 x 1920 pixels. Matching these dimensions before uploading helps avoid unnecessary cropping or resampling by Instagram.